Cricut + Simplicity + wildboho

I wish I could tell you that I love sewing something from a pattern, but in the interest of full disclosure, I’m going to tell you that it is one of my least favorite things to do!

What I do like to do, is stray outside of the lines and not have to worry about staying within the confines of a pattern!

So….when I was given the opportunity to work with one of Simplicity’s new patterns for the Cricut Maker, I hesitated and had to work myself up to giving this a try. I already knew that the machine would do much of the work…cutting the pieces, etc, but I wasn’t sure I was up for the challenge of following a pattern!

Because I have a soft spot for flowers, this Flower and Arrangement pattern caught my eye and I thought it might make a unique embellishment for a piece of hoop art. So, with reluctance (!),  I accepted the challenge.

Screen Shot 2018-05-23 at 11.36.27 AM

I’m going to walk you through this pattern, step by step, and I’ll give you a little hint about the process…it wasn’t as scary as I thought it was going to be!

Alright, let’s start this pattern!

Step One: gather your Cricut materials and the Simplicity PDF pattern.

img_7863

You will need the fabric mat, the rotary blade for cutting fabric and the washable fabric pen for marking the pattern pieces.

Step Two: gather your fabrics.

The pattern shows you the pieces that make up the flower. You can base your color choices off of that like I did my second time through.

I’ll be honest and tell you that I forgot to print the pattern directions first and so I just randomly picked colors from my pile of fabrics when it told me to insert a new mat!

It all turned out very pretty in the end but I would not recommend that you use my method!!

So, you’ve read through the pattern (well done, you!) and you’ve chosen your fabrics. It’s time to move on to Step Three: Let the machine do the work for you!

The screen shot shows you what you will see in Design Space. From this point on, you will just be putting the correct fabrics on the mats and the machine will do everything else!

Screen Shot 2018-05-23 at 11.36.57 AM

The rotary blade and washable pen are in position and my fabric is ready to be cut!

Check this out: do you see all of those perfect little points that have been cut out? Yup, the machine did that, not me!

Step Four: continue letting the machine do the work! How easy is that?!

You will soon end up with a tidy little pile of cut pieces, just like what you see below!

One suggestion after working through this pattern a few times: when you get to the two round circle pieces, choose a heavier fabric. My first choice was a thinner batik piece of fabric. My second choice was a heavier piece of textured cotton fabric. Finally on my third time cutting the pieces for the pattern, I decided to use a scrap of  wool felt and that was definitely the best choice. The other fabric pieces worked fine, but because this is the piece that you are hand sewing everything on to, you want something fairly sturdy.

I should also warn you that Step Five involves me breaking from the pattern in one other way: I did not use my sewing machine! Nope, not once.

If you follow along with my stitching adventures, you’ll already know that I prefer hand stitching to machine sewing. I wanted to try this entire pattern without the machine, just so that I could tell you that it was possible! And it is!

Your pieces have all been cut and you are ready to turn them into flowers!

This was the only step that slightly confused me and so I wanted to show several pictures to help you out.

You will fold the sides of your rectangular piece in towards the center.

Next you will fold that piece in half.

Grab a needle and some thread (I prefer the Sulky 12wt petites for this step) and stitch a running stitch along the bottom.

Tie a knot and then pull your thread right so that the fabric gathers up nice and makes a little ruffle.

The blue marks and the pattern will show you where each piece is to be stitched on to the circle.

Continue with each piece of fabric, following the directions as to where to attach it to the disc.

Because I (unfortunately) only have two hands, I couldn’t take pictures of how I actually wrapped the rose. That step is mostly self-explanatory and if I was able to figure it out, then you will just fine!

Soon you will have a complete flower!

So, what to do with your flower at this point?

Well, you can leave it completely as is and be done! Stitch a pin back or hair clip onto it and wear it as an accessory!

Or, and you should also know that this is always my go-to option, you can put it in a hoop!

Here is my simple version of the flower and arrangement attached to a fabric that has been stretched in a hoop.

Simple and pretty!

But, why stop there? You could take it one step further and add other embellishments, like the pattern suggests.

Here is my gussied up version! I added wispy bits of lace, gears and buttons.

And because I love to show you options, (and can’t resist Boho-ing up a project!) here is what you can create if you cut a few extra pieces and arrange them to your liking!

Each piece in the above hoop has been cut by my Cricut Maker according to the pattern. I just rearranged pieces and added some embroidery!

And speaking of embroidery, do you see those words?

My absolute favorite feature of using Design Space and my Cricut Maker is that I can create text and have it written directly into fabric with the washable pen!

So many fonts! So much versatility! I cannot gush enough about this function!

Since unboxing my Maker, I have used this function more than anything else. There’s not stopping me…I can add words to anything!

And there you have it..my first Simplicity pattern and I survived and actually went on to make it several times and enjoyed the process!

Now I can breathe a sigh of relief and pass some confidence on to you. Now, go….create something!


Fabrics provided by:

Flaurie and Finch (Blossom Batiks)

Andover Fabrics (Alison Glass Mariner Cloth and Golden Hour)

Threads I used:

Sulky 12 Wt Petites

Sue Spargo Eleganza


This is a sponsored conversation written by me on behalf of Cricut. The opinions and text are all mine.
Coloring with Thread Book Showcase

Photo courtesy of The Quilting Company 

Late last year, I was excited to work on a stitching project based on a pattern by Tula Pink that was going to be included in her new embroidery book, Coloring with Thread: Stitching a Whimsical World with Hand Embroidery.

Check out that center Octopus hoop in the picture up there (maybe, just maybe, it was stitched by yours truly!)

If you love Tula Pink’s fabric, then, no doubt, you will be excited to get your hands on a book full of her embroidery patterns!

When I was asked to stitch up another pattern from her book as part of the Coloring with Thread blog tour, I couldn’t wait to try Boho-ing up one of her designs: the Double Bunny.

I feel like I need to add this disclaimer before going any further: for my sanity (and yours!), I highly recommend enlarging your chosen patterns before you try this method for yourself. Seriously. Tula Pink designs are gorgeously intricate but cutting so many teeny, tiny fabric pieces might just be enough to push the most patient of fussy cutters to the brink of frustration!

I began with enlarging the Double Bunny pattern.

Enlarging a pattern is incredibly easy if you have an office supply store nearby. Take your pattern in and ask them to make an engineering print in whatever size you need. I enlarged the Double Bunny pattern to 14″ and it fits perfectly in a 14″ hoop.

Once I had my copy of the pattern, I used the techniques outlined in my book, Boho Embroidery to transfer the pattern to a selection of my favorite Tula Pink fabrics.

Here’s what I ended up with once I ironed all of the fabric pieces in place.

Using Madeline Tosh Unicorn Tails yarns and the Stem Stitch, I outlined all of the pieces. You can see what a difference it makes when each piece has been outlined:

And then I just kept on embroidering! I added sequins and beads and finished it up just in the nick of time so that I could share it with all of you! Here’s how it looks all stitched up:

And how about some up close and personal detail shots, because it’s all about the details!

The sequins make these feel like Disco Bunnies, don’t they?!

And there you have it!

If you want to try your hand at an embroidery project like this, here are the specialty Threads and beads that I used:

This yarn is really fun to embroider with….I mean, check out those colors! You can find these “Unicorn Tails” at Mad Tosh.

If you’ve been following along for awhile now, you already know how much I love the Eleganza Perle Cotton from Sue Spargo and Wonderfil Specialty Threads! I used the size #8 and in some cases doubled it up so that my stitches stood out next to the Unicorn Tails. I could have just used a size #5 or #3, which are both thicker, except I was gifted this box of threads and the colors matched perfectly!

Another one of my favorite threads (especially to use when working with beads and sequins) is Sulky Petites. These threads are approximately the weight of 2-strands of a floss like DMC that gets separated, except you can use these right off the spool without separating strands.

And speaking of beads, my favorite seed bead source is Fusion Beads. (How about that neon pink?!) I used size 8 seed beads for this project.

And if all of this seems completely overwhelming and you just want to stitch a pattern, look how completely different this project can be if it is simply embroidered using the Tula Pink color guides and her pattern from the book!

photo courtesy of The Quilting Company and stitched by Elise Baek

Please be sure to check out all of the other amazing embroidery projects on this Book Showcase!

Here’s the full schedule:

Monday, November 27th — The Quilting Company

Tuesday, November 28th — Minki Kim, Minki’s Worktable

Wednesday, November 29th — Nichole Vogelsinger, Wildboho

Thursday, November 30th — Amanda Carestio, Sew Daily

Friday, December 1st — Nydia Kehnle, Nydia Kehnle Design

Monday, December 4th — Sharon Burgess, Lilabelle Lane Creations

Tuesday, December 5th — Cindy Guch, Raspberry Sunshine

Wednesday, December 6th — Sandi Sawa Hazlewood, Crafty Planner

Thursday, December 7th — Wynn Tann, zakkaArt

Friday, December 8th — Elise Baek, Elise & Emelie

Monday, December 11th — Ann Blalock, Coats & Clark Sewing Secrets

Tuesday, December 12th — Sara Lawson, Sew Sweetness  * Watch the Facebook Live video at 7pm CST

Wednesday, December 13th — Nancy Jewell, Free Spirit Fabrics

Thursday, December 14th —Annette Allison Millard, The Sewful Life

Friday, December 15th — Brenna Riley Gates, The Quilting Company

Thread Round-Up

As someone who works with lots of threads and always on the lookout for new colors and textures to try, it is one of my favorite questions when I am asked: “what threads do you recommend?”

So here’s a quick thread round-up for you if you are thinking of starting an embroidery project and want to try something new!


Hands down, my favorite everyday embroidery thread is Eleganza Perle Cotton. A collaboration with Wonderfil Specialty Thread, these colors from Sue Spargo are rich and saturated and match any project I am working on.

In the picture below, you will notice that size 5 is slightly thicker than size 8. With Perle Cotton, you do not need to separate threads, like you might typically do with regular floss. This is meant to be used directly off the spool, which might partially be why I like it so much!

You also get a lot of thread for your money with these spools! The size 5 comes in 40 yard spools and the size 8 comes in 70 yard spools.

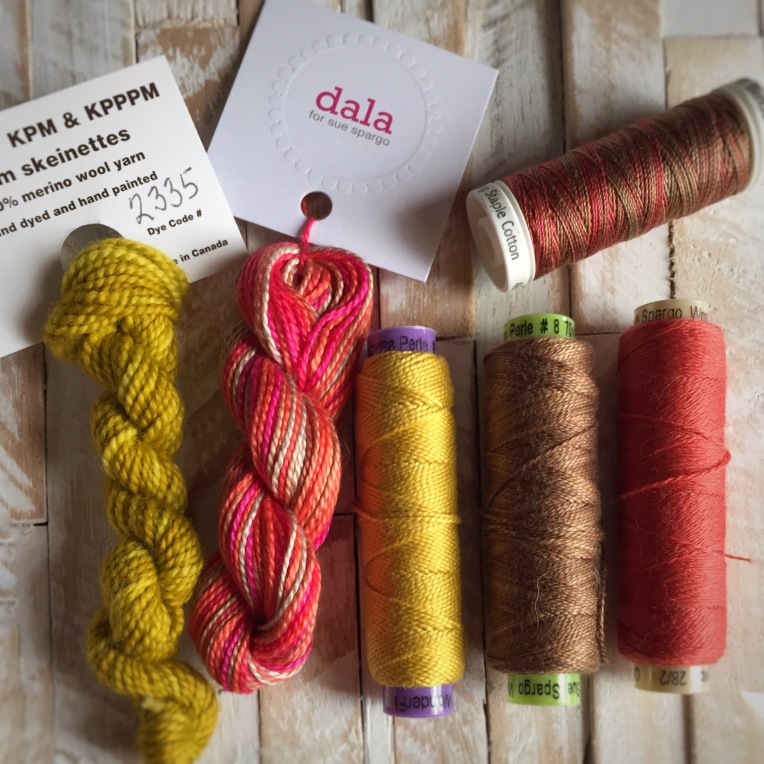
This Dala Perle Cotton also comes from Sue Spargo, only this one is hand-dyed in small batches by her daughter, Kelly. The colors in these variegated threads are also incredible!

If you are used to using thinner threads but want to add a bit more texture to your work, I suggest giving this particular brand a try. It is easy to work with, does not need to be separated and also adds lovely visibility to your stitches. And notice the twist in the threads? That adds to the texture of your work and gives it a bit of shine. If you are going to be spending lots of time adding your embroidery to a project, you definitely want those stitches to stand out, right?!

Have you ever worked with wool yarn or thread in your embroidery? If you haven’t, these are my two favorite brands of wool yarn to use in my hand stitched projects.

On the left is Koigu Needlepoint Yarn which I picked up on a recent trip to Purl Soho in NYC. It comes in 11 yard hanks and is the weight of a fingering yarn. It does not need to be separated like regular embroidery floss. I have found that even though it looks thicker, it threads through Milliner’s Needles easily and I haven’t had any problems using it in my embroidery.

The Ellana wool thread on the spool is from Sue Spargo. Compared to the spools of Eleganza Perle cotton, this thread is thinner and wispier. I like to use it double stranded, but if you are looking to add delicate texture, then you can certainly use it as a single strand. This also comes 70 yards to a spool and the color selection cannot be beat! I could seriously find a use for every single color in this collection!!!

My favorite threads for adding beads to my work are these Sulky Petites and Sulky Blendables. When compared to a DMC type floss, these are the weight of 2-strands of floss. Each spool is 50 yards. I like using these to add beads because the colors are subtle enough to blend with my work and I rarely have problems with the thread tangling. This is a nice, lightweight addition to my embroidery toolbox!

Boho Stitch Along. Week no. 23

Welcome back for Week no. 23! If you are just beginning a piece for the #BohoSAL, check out my previous posts here. And if you are new to embroidery and want to learn the basics, check out my embroidery book, Boho Embroidery for everything you need to get started!


I picked up my Urban Artifacts hoop again this week after not stitching it for awhile. It’s like coming back to a comfortable old friend! I haven’t shown a full view of this hoop since I started stitching it back in January, so here is where I am so far:
I worked a little bit of couching this week and added some beads to coordinate with the variegated thread that I used.

This thread is beautiful. It is called “Fly a Kite” and is a mix of buttercup, spearmint, ice and bluejay blue colors and is from a Limited Edition color pack (which, P.S. it looks like is still available!) from Sue Spargo. I typically do not use much size 3, the largest perle cotton size, but I don’t know….i’m really liking the thickness of this size to stitch with.


As far as other stitchy happenings this week, if you checked out my Instagram stories, you’ll remember I was stitching up a Liberty pincushion from a kit that I bought from Nicole at Modern Handcraft. Have you seen her Hexie pincushions yet?! If not, check them out! I love, love everything that she makes!

I bought this kit ages ago and am so proud of myself for finally finishing this thing! And, bonus, it is just adorable in my workspace!


And lastly, I was really excited to attend Book Expo America, the largest book fair in North America, this week. I was there for a Boho Embroidery book signing. It was great to meet so many librarians who will be using my embroidery book as part of their summer program series and giveaways at their libraries.

My color/texture loving self could not get enough of this display! Made from recycled paper, each round of paper was hand lettered and illustrated by both artists and visitors to the booth. It was truly stunning and this picture only captures a small section of the display!

Between fan-girling at Book Expo (I saw Mo Willems from a distance!) and my book signing, I had a small window of time to run over to Purl Soho and geek out over the displays of Liberty fabrics and wall of yarns.

And spotted some wool Ellana in action too!

What a whirlwind day in the city!

Hope your week went well and don’t forget to check out the beautiful hoops being stitched up in the #Bohosal pool!


Boho Stitch Along. Week no. 21

Welcome back for Week no. 21! If you are just beginning a piece for the #BohoSAL, check out my previous posts here. And if you are new to embroidery and want to learn the basics, check out my embroidery book, Boho Embroidery for everything you need to get started!


For the moment, I can stitch just to stitch and not to meet a deadline, which is really an enjoyable thing…when it happens!

So this week, working with my Gertrude Made fabrics for my #BohoSAL piece, I began to add beads galore to my Boho Stitch Along piece. With a piece like this, I had no specific plan of what I was going to stitch, what stitches to use, etc. I knew I wanted to add a running stitch along the background, so that’s where I began. While I was working on the running stitch, it gave me time to really look at the fabric and decide what my next move would be! Plus, I have all of these great beads in shades of green and I just knew I had to add them somewhere!!

img_9927


In other news, it’s Spring Quilt Market time! I’m not there, but several of my hoops made the journey to St. Louis

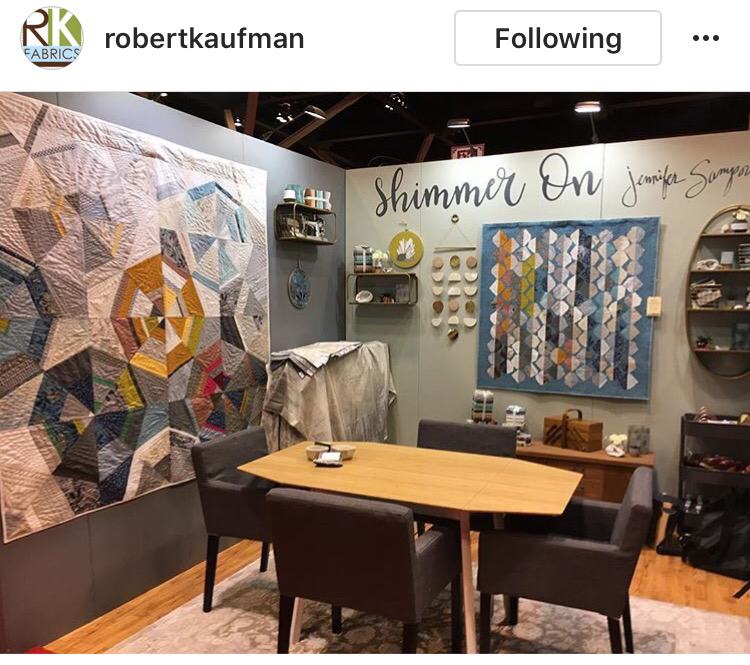
I was really excited to be asked to work with the beautiful Shimmer On fabric by Jennifer Sampou for Robert Kaufman.

Here’s a full view of the booth:

img_9929

And here are a few close ups of the hoops that I made:
img_9880-1

img_9882
img_9883

I was also asked to make a hoop for Sue Spargo’s booth using my favorite Eleganza threads. Here’s a view of her booth in all it’s colorful gorgeousness and also a close up of the hoop that I made using Heather Bailey’s “Hello Love” fabrics:

img_9908

I was also thrilled to create a few projects for Andover Fabrics using the upcoming Chroma Handcrafted fabrics from Alison Glass.

img_9914

img_9930

img_9931
img_9932

And last but not least, here is the Alexander Henry booth and that citron owl hoop is one I was commissioned to make awhile back. I love that hoop! It is complete with a pink tulle skirt and lots of metallic threads throughout!

Well, that’s a wrap!

Don’t forget to check out the tag #Bohosal to see what our other stitch along friends have been up to lately!

Hope you all had a great week and happy stitching!

Boho Stitch Along. Week no. 19

Welcome back for Week no. 19! If you are just beginning a piece for the #BohoSAL, check out my previous posts here. And if you are new to embroidery and want to learn the basics, check out my embroidery book, Boho Embroidery for everything you need to get started!


My stitch Along piece this week is a hoop that I am making as a gift for one of my boy’s teachers…a little late for teacher appreciation week, but it will be done soon!

How cool is this fabric from Free Spirit Fabrics from the line, “Neptune and the Mermaid”?!

There’s a story behind this one, though…

I saw this fabulous fabric online and just had to buy it immediately (from Circa 15 Fabric Studio). When I buy fabrics, I don’t typically buy large quantities…usually a fat quarter or a 1/2 yard works for most of my projects. Not checking the size of this octopus, I quickly added a 1/4 yard to my cart and then added a few other things and then checked out.

I couldn’t wait to open the fabric when it arrived. Sadly, I realized that, with this particular fabric, I should have ordered a larger cut because I didn’t get one complete octopus. SO…if you like this one and want a complete octopus, don’t make my mistake and think you can get by with a 1/4 yard!


Here’s how I’ve made lemonade out of my lemon-ish purchase! I’ve been using the Lion Brand bonbons and seed beads to add swirly octopus legs around the flowers on the fabric.

I think it’s a pretty good fix, right?!


And speaking of Octopi (because we were, right?!), here’s another one I’ve been stitching. This one required lots and lots and LOTS of fussy cutting and another Free Spirit Fabric this one from Heather Bailey‘s “Hello Love” line. You’ll be seeing lots more from this one as I finish it off to send to Sue Spargo for Quilt Market this week!

Speaking of purchases (because we were, right?!), look at this beautiful trim! I have no particular project in mind for these, but I saw them and knew I had to have them for something!

And speaking of Quilt Market (because we were, right?!) Here’s a detail shot of one of the hoops i’ve been making for Robert Kaufman’s booth with the upcoming Jennifer Sampou “Shimmer On” fabrics (coming out in August).

Remember how I told you I love these Sulky 12 Wt. Cotton Petites? Well, this is what I love them for…they are brilliant for adding beads to my embroidery! They do not break (like when I tried to use just plain sewing machine thread) and you don’t have to separate threads (like when you use floss).

I’ll post more pics of these hoops around Quilt Market time!

And speaking of sneak peeks (because we were, right?!) Here’s a peek at a mini quilt made with my Fractured Color Wheel Embroidery Pattern. I used some of my favorite Anna Maria Horner fabrics combined with so beautiful You and Me batiks. My mom (even though she told me not to give her any credit!) did the quilting and binding and everything else for me!) It turned out better than I was picturing!! How about that butterfly in the center?!

So that’s this week all wrapped up! Hopefully your week was less jumbly and jam-packed than mine was (!) and that you have plenty of time for stitching in the coming week!

Happy stitching!

Boho Stitch Along. Week no. 17

Welcome back for Week no. 17! If you are just beginning a piece for the #BohoSAL, check out my previous posts here. And if you are new to embroidery and want to learn the basics, check out my embroidery book, Boho Embroidery for everything you need to get started!


My stitch along piece for the week is going to be stitched at a slightly rapider pace than I normally choose to work at for a project like this, but it is only because I am up against several deadlines. That doesn’t take away (too much!) from my enjoyment of a project, but you are going to see a quicker turnaround from start to finish on this hoop!

The fabric that I am using is by Cori Dantini, who has been one of my favorite artists for several years now. I have prints of her work (which you can buy in her etsy shop) and her fabric was what I used to make some of my very first hoops! You can see some of the projects that i’ve made here and here and here and my very first one here! I love to see the progression of my stitching!
Here is a picture of the fabric before I have stitched anything. I have had lots of requests that I show a complete before and after and i’m doing that with this one! So here she is along with several threads I plan on using: the mohair spools and sea grass are from The Thread Gatherer and the Eleganza Perle Cotton are from Sue Spargo.

After a day of stitching, here is what I have:


She needed some purple Mohair strands in her backstitched hair and I used the Sea grass in the flowers to the left of her and running through the blanket stitch along the border. I also added beads added a whip stitch alongside of the blanket stitch.


There are so many awesome hoops in the #Bohosal pool and I decided to share several of the close ups that i’ve been loving! But first, I had to share this one…

I’m pretty sure @codycindy wins the award for best Boho Stitch Along location! Maybe we need to make that be a thing! This is just beautiful and i’m always a fan of anything Alison Glass and bees! And seriously, that backdrop gets all the heart eyes from me!

How much fun is this piece from @judith_b_richardson …such intricate detailing on each lady! Check out her feed too for lots of fun bead/embroidery combos!


I just love the simplicity of a backstitch and @craftingwithoutkids shows just how beautiful it can be added as an outline on the leaf.

Ok, seriously?! @mamacesare is adding the tiniest of details to these little tiny squares and i’m just smitten with both the colors she chose and the details themselves!

Look at the beautiful detail in the center of this flower that @quilterathart has been adding. I just love the teal/brown/gold combo alongside the purples and pinks!

@swoodsonsay has been adding such little details to these butterflies and I think they are just too sweet!


In case you missed it, Abby Glassenberg of While She Naps had me as a guest on her podcast.  You can listen to the podcast here or on iTunes. And while you are at it, check her out on Instagram. We talked Boho Embroidery, Etsy, Instagram and lots of other great stuff!

Enjoy looking through the Stitch Along posts and i’ll see you back here next week!

Happy stitching!

Boho Stitch Along. Week no. 15

Welcome back for Week no. 15! If you are just beginning a piece for the #BohoSAL, check out my previous posts here. And if you are new to embroidery and want to learn the basics, check out my embroidery book, Boho Embroidery for everything you need to get started!


You may have noticed that I tend to jump around a lot with my #Bohosal piece!! It’s really just to keep you on your toes and not at all because I have too many ideas to contain to just one piece!!!
This week I started and finished a project. When I have lots of deadlines and projects going, I find it works best to introduce yet another project, just to really make my week tricky!

I like to move around the art on my walls fairly regularly, which means that I sometimes end up with pieces that just don’t work anymore. I had a canvas picture of a bike and I just couldn’t make it fit anymore. So I decided to pull a piece of fabric that I really liked and embroider that and then staple it over the canvas picture. This is one of my favorite ways to change up art!

I chose a print from the Shiny Objects collection by Flaurie and Finch. I’ve worked with their fabrics a lot in the past and love the details that are included in each of the fabrics. This collection has metallic bits sprinkled throughout, which is so much fun!

I began with a running stitch in several varieties of thread: Eleganza Perle cotton, Silk Thread and even some yarn. Next up I added beads to the running stitch. I finished up with satin stitching around the flower and a neon leaf or two to really make the flower pop off of the fabric.

I’m thrilled with how it turned out!

Next week i’ll share some of my favorite #BohoSAL posts from our ever-growing pool! How exciting to look through all of the pictures and see so many hoops in progress!

Have a great week and Happy Stitching!

-nichole


Boho Stitch Along. Week no. 9

Welcome back for Week no. 9! If you are just beginning a piece for the #BohoSAL, check out my previous posts here. And if you are new to embroidery and want to learn the basics, check out my embroidery book, Boho Embroidery for everything you need to get started!


We had a preview of Spring here in the Northeast this week and everything about the colors on my Stitch Along piece makes me think of warmer weather! I added a few straight stitches to the upper portion of my hoop this week.

These threads are the BRAND NEW colors from Sue Spargo. It’s obvious that #ihavethisthingwiththread, right?! So I couldn’t wait to break out these colors: Soldier Boy  on the left and  Hoppytoad on the right, both in size 5.

Let’s see what our stitchers have been up to this week!


I noticed a geometric theme with some our our Stitch Along hoops this week and so that’s what i’m featuring today!

@willowandtroutmakerie added some fun texture to this hexie fabric with silk ribbon bees…how fun are they?!

@leighbee279 is highlighting those hexie shapes with a neon green backstitch! Love that additional pop of color!

This is one of my favorite Anna Maria Horner fabrics (although I don’t have this color way!!!), and @mamacesare is adding the Fly Stitch and Palestrina Knots to her hoop. Love the addition of red!!!

The Trellis Stitch that @stitchingkat is adding to this Kaffe Fassett is just…WOW! I love every bit of this!


Remember last week I said I had been working on a hoop for Heather Givans? Well, here it is at QuiltCon!


I used the center section of the Reading Circle EPP pattern from Heather to create this 10″ hoop and I made it using the mock-EPP method that I demonstrated in my book.

The Grafic fabric from Latifah Saafir is seriously amazing and I was looking for an excuse to use it in another project!

Make sure to check out the #readingcircleepp hashtag so that you can see the gorgeous roundup of (full-size) projects created for the Crimson Tate booth at QuiltCon.


Now before I go, how about a challenge for all of you Boho Stitch Along-ers out there!

Are you nosy….I mean curious like me and want to see the tools, threads, cases that other stitchers use on a daily basis?

Here’s what one of my stitchy ArtBins looked like last week while I was knee deep in three different projects!

And scrolling through the stitch along feed, I came across this little gem from @andreatebs.

So there’s your challenge. An easy one, right?!

Now, back to stitching….

Have a great week!

-nichole