Boho Stitch Along. Week 3

To catch up, you can check out each week of the Boho Stitch Along right here!


Before I show you what I’ve been working on for my Boho Stitch Along this week, I wanted to share my upcoming classes for the summer! If you’ll be on the East Coast from June-September, you just might be able to catch a Boho Embroidery class!

Here is my summer schedule:

June 16, 2018: Finch Knitting and Sewing Studio, Leesburg, VA

July 6, 2018: (Just for TEENS!), Pennington Quilt Works, Pennington, NJ

July 6, 2018: Pennington Quilt Works, Pennington NJ

August 5, 2018: Sew Inspired Quilt Shop & Studio, Simsbury, CT

August 11, 2018: Alewives Fabrics, Damariscotta, ME

September 29, 2018: The Old Country Store, Lancaster, PA


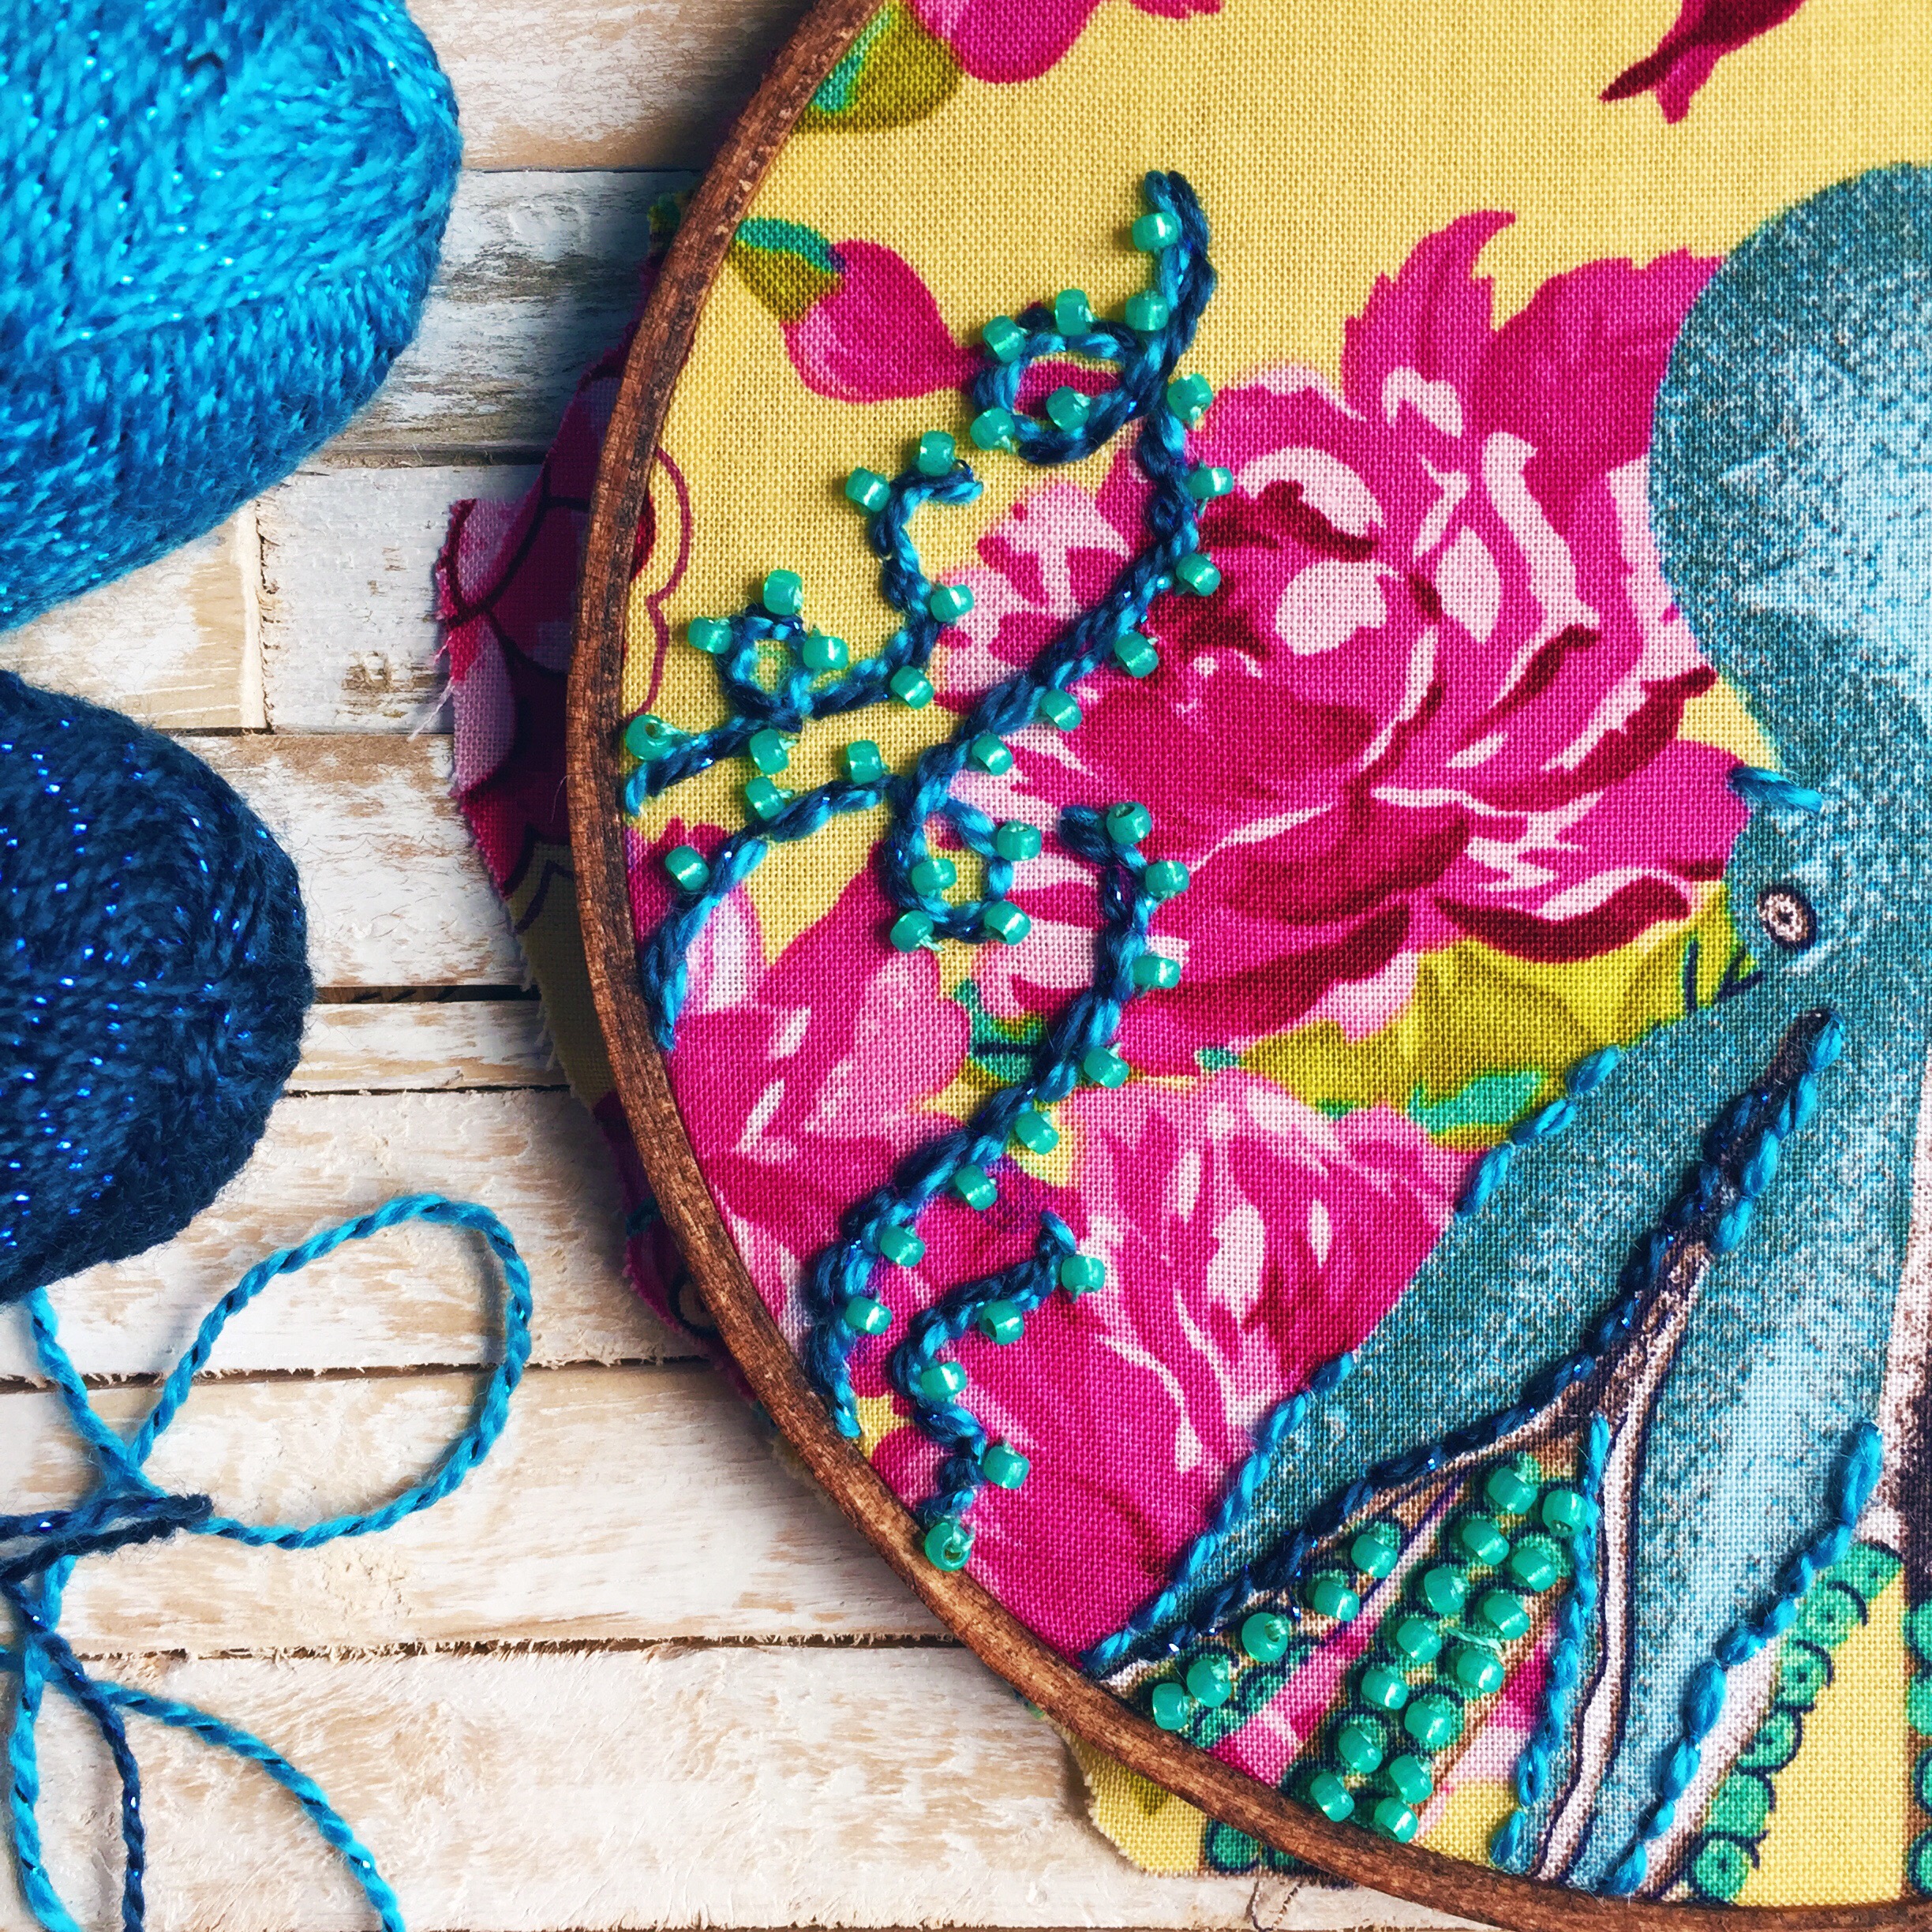
So this week, besides a mad cleaning of my studio (more on that below), I focused on the center medallion of my project.

Using a combination of straight stitches and beads, I have almost completed this medallion!

The center of the center is a small mirror that I attached with a variation of the Shisha Stitch (I cover this stitch in my upcoming book!)

For next week, I plan on finishing up the center and then moving on to the feathers above the center medallion.

I’ll also be stitching some projects for Quilt Market and so i’m not sure how much i’ll be able to tackle…maybe it’s overly ambitious to think i’ll be moving onto the feathers! We’ll just have to see what the week brings!

The thread that I love to use for beading and embroidery is from Sulky and is called Sulky Petites. It is a 12 wt thread, which is about the thickness of 2 strands of a dividable floss would be. I love the variety of colors that it comes in and I can always find a match to the beads and fabric that i’m working with!

The beads that I used on the center are size 11 seed beads and are smaller than the size 8 beads that I used on the words “Magpie Dreams” from last week. I find my beads online and my favorite shop is Fusion Beads.

The adorable bird needle minder is from Alison Glass.


I have a tiny stitching studio in my home and the size forces me to constantly stay on top of how organized my projects are! When I finished writing my second book in the Fall, I transitioned right into Quilt Con prep and then in the February, attended Quilt Con. Before I knew it, Spring had arrived and I had a lot of chaos to deal with in my studio.

This week I decided I needed to tackle my space before starting on the next big project. Today finds me feeling much more organized and with room to breathe and work in my area!

I was also super excited to set up my brand new Daylight Company Slim Line LED Table Lamp. I have great afternoon lighting in my space, but morning and evening is a different story! I’ve been working with an Ott-Lite bulb in an ordinary desk lamp from Target. I have gone through 3 different Ott-Lites, each covered by warranties, and this bulb has been temporary solution until I found a lamp that I loved and that wouldn’t die on me when I needed it most!

Enter the Slim Line LED Table Lamp. I finished the Great Studio Clean-Up of 2018 yesterday and that was when my new lamp arrived. Hello perfect timing!

By last night, I was all set up and wanted to document just how awesome the light is and how i’ve probably been killing my eyes with my previous lamp!

Here’s the before (notice the Ott-Lite bulb sticks out further than the lamp shade?!):

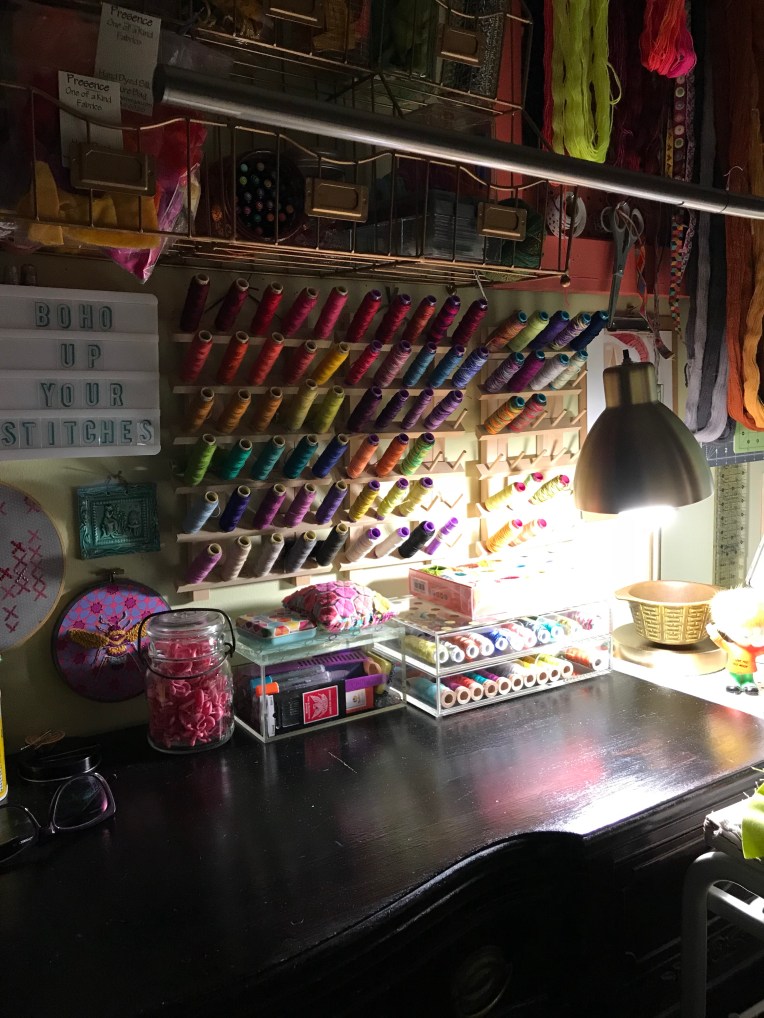
And just look at the after with my new Daylight Company lamp!

I can clearly see every single thread color now!

A special thanks to Sariditty and Daylight Company for this lamp and if you want a coupon to save 20% off of your lamp purchase, use SARIDITTY18 at checkout!
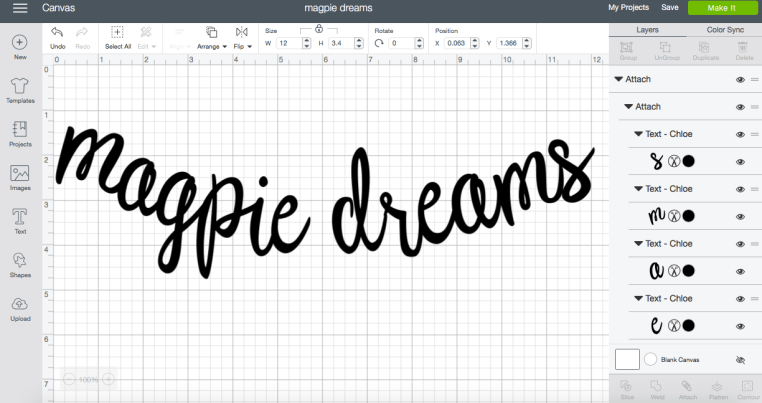
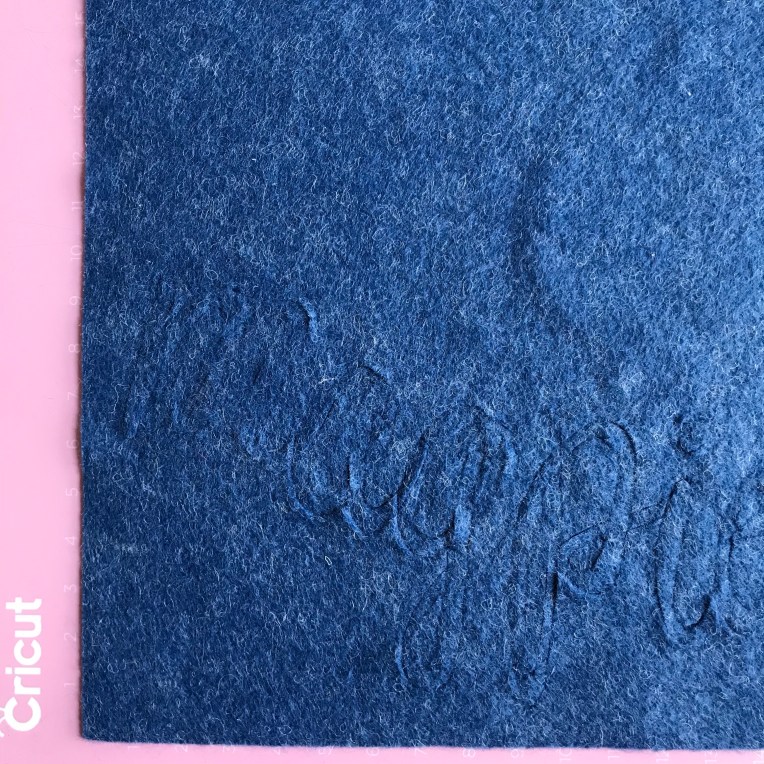
Where to begin? Boho Stitch Along: Week 1

I posted a picture on Instagram yesterday and received so many messages along the lines of things I’ve heard many times before, both on IG and at the workshops that I teach, basically: “I love what you do and would love to try this but I wouldn’t even know where to begin!”

So, to help those nervous, embroidery-loving enthusiasts among you, I decided I would take this hoop and show you my start to finish process. Warning: it’s probably going to be rambly and messy (welcome to the inside workings of my brain)!!! But that’s art, right?! At least it is for me and most likely will be for you too.

This is not going to be a quick finish. You’ve heard of Slow Stitching, right? This is that! If you followed along with the Boho Stitch Along last year, you’ll know that embroidering a large piece of fabric takes time. So, grab a piece of fabric that you love and have been wanting to embroider and just put it in a hoop (like I did) and go through this process with me!

I’ll share my work here weekly, along with tips and some fun ideas for adding extra bits to your project.

P.S. I hear there is an amazing embroidery book written by yours truly that can help you learn how to embroider! And if you have that one, I hear there is an equally awesome second embroidery book coming very soon, you know, if you’re interested!


Let’s get started!

First off, you will want to choose your fabric. Pick something that you like…you will be spending lots of time looking at every detail of the fabric!

I have chosen this gorgeous design by Kathy Doughty for Free Spirit Fabrics: Magpie Horizon. I love birds, feathers and this color palette, which made this an easy choice of fabric.

My cut of fabric is a fat quarter (which is a quarter yard of fabric, but cut in a square), so I began with unfolding it to decide what section of the fabric I wanted to include in my hoop. The Magpies fit perfectly into a 12″ hoop and so that was an easy decision.

Next step: threads! I have a lot of thread, so I chose 5 colors to get started. I’m not limited to only using those colors…I can add colors any time that I want, but this is a non-intimidating start to a project. Pick 5 colors that coordinate with your fabric.

These are all spools of Perle Cotton thread from Sue Spargo.

At this point, once my fabric is in the hoop and I have trimmed it (leaving about 1 inch all the way around), I prop it up while i’m working on other things and by doing that i’m getting familiar with the elements on the fabric i’ve chosen.

I did this yesterday and this morning I decided to add the words Magpie Dreams to this hoop. What are Magpies known for their love of? Shiny things! And what do I love to include in my embroidery? Shiny things! Beads, sequins, etc.

If you’ve been following along here, you’ll know that in the past I have raved about my Cricut Maker machine for cutting out words to add to embroidery. So that was my next step.

With Cricut’s Design Space app, I was able to type the words Magpie Dreams, change the font to something more swirly, and curve the words so that would fit along the bottom of the hoop. (That is a new feature and I used it for the first time today!)

Screen Shot 2018-04-13 at 11.19.10 AM

If you are new to Design Space, here are a few things i’ve learned while working with letters:

  • type the full set of words you want to use
  • choose your font
  • if you want to add a curve to the words, do it at this point
  • to make your letters connect, click “Ungroup” and it will make each letter something you can work with individually
  • play with the letters…move them around, make them bigger, smaller, etc.
  • when you like how they look, you will group them together again by clicking on the first letter and the Shift key. While still holding the Shift key, you will click on each letter in your group of words and it will then group everything you have clicked together.
  • I then attach them (the button at the bottom right side)
  • And I learned today how important the Weld button is. When you weld the letters, it groups them all together when cutting and you don’t get little bits of letters cut off.  (I may have had to do this 2 or 3 times before I realized the Weld button was going to save my project and sanity…I promised you messy, right?!)

Here’s what it looks like when I am ready to begin cutting the letters out of felt. I load up the mat with the felt pressed to it and the Maker does the rest!

So from there, I pick the words that have been cut out of the felt and I place them upside down and then spray them with the Dritz Spray Adhesive. I love this product because it lets you adhere something without using an iron and it is removable up until the point that you have stitched it to the fabric!

Also, this was an incredibly messy step. Seriously. Just picture me trying to get a photo of putting the words on the fabric while having felt bits stuck to my fingers because of the adhesive spray. (Notice there is no picture here of that step?!! There is a reason for that!)

So, I dealt with the mess and took a picture of the end result instead!

The words will stand out more once I stitch them, but i’m really liking where this project is headed!

And there you have it! By the time another week rolls around, I will have started to embroider on this piece and I will share with you what I have done.

In the meantime, if you have a piece of fabric you’ve been wanting to try this with, it’s probably time for you to pull it out and get started!


So to recap the steps for beginning your project this week:

  1. Choose your fabric and hoop size.
  2. Pick 5 matching threads.
  3. Become familiar with your fabric.
  4. Choose one area you want to begin stitching.
  5. Gather your embroidery tools: scissors, needles, etc.
  6. Pick one stitch that you want to try and just get started!


Note: There are affiliate links included in this post.

Coloring with Thread Book Showcase

Photo courtesy of The Quilting Company 

Late last year, I was excited to work on a stitching project based on a pattern by Tula Pink that was going to be included in her new embroidery book, Coloring with Thread: Stitching a Whimsical World with Hand Embroidery.

Check out that center Octopus hoop in the picture up there (maybe, just maybe, it was stitched by yours truly!)

If you love Tula Pink’s fabric, then, no doubt, you will be excited to get your hands on a book full of her embroidery patterns!

When I was asked to stitch up another pattern from her book as part of the Coloring with Thread blog tour, I couldn’t wait to try Boho-ing up one of her designs: the Double Bunny.

I feel like I need to add this disclaimer before going any further: for my sanity (and yours!), I highly recommend enlarging your chosen patterns before you try this method for yourself. Seriously. Tula Pink designs are gorgeously intricate but cutting so many teeny, tiny fabric pieces might just be enough to push the most patient of fussy cutters to the brink of frustration!

I began with enlarging the Double Bunny pattern.

Enlarging a pattern is incredibly easy if you have an office supply store nearby. Take your pattern in and ask them to make an engineering print in whatever size you need. I enlarged the Double Bunny pattern to 14″ and it fits perfectly in a 14″ hoop.

Once I had my copy of the pattern, I used the techniques outlined in my book, Boho Embroidery to transfer the pattern to a selection of my favorite Tula Pink fabrics.

Here’s what I ended up with once I ironed all of the fabric pieces in place.

Using Madeline Tosh Unicorn Tails yarns and the Stem Stitch, I outlined all of the pieces. You can see what a difference it makes when each piece has been outlined:

And then I just kept on embroidering! I added sequins and beads and finished it up just in the nick of time so that I could share it with all of you! Here’s how it looks all stitched up:

And how about some up close and personal detail shots, because it’s all about the details!

The sequins make these feel like Disco Bunnies, don’t they?!

And there you have it!

If you want to try your hand at an embroidery project like this, here are the specialty Threads and beads that I used:

This yarn is really fun to embroider with….I mean, check out those colors! You can find these “Unicorn Tails” at Mad Tosh.

If you’ve been following along for awhile now, you already know how much I love the Eleganza Perle Cotton from Sue Spargo and Wonderfil Specialty Threads! I used the size #8 and in some cases doubled it up so that my stitches stood out next to the Unicorn Tails. I could have just used a size #5 or #3, which are both thicker, except I was gifted this box of threads and the colors matched perfectly!

Another one of my favorite threads (especially to use when working with beads and sequins) is Sulky Petites. These threads are approximately the weight of 2-strands of a floss like DMC that gets separated, except you can use these right off the spool without separating strands.

And speaking of beads, my favorite seed bead source is Fusion Beads. (How about that neon pink?!) I used size 8 seed beads for this project.

And if all of this seems completely overwhelming and you just want to stitch a pattern, look how completely different this project can be if it is simply embroidered using the Tula Pink color guides and her pattern from the book!

photo courtesy of The Quilting Company and stitched by Elise Baek

Please be sure to check out all of the other amazing embroidery projects on this Book Showcase!

Here’s the full schedule:

Monday, November 27th — The Quilting Company

Tuesday, November 28th — Minki Kim, Minki’s Worktable

Wednesday, November 29th — Nichole Vogelsinger, Wildboho

Thursday, November 30th — Amanda Carestio, Sew Daily

Friday, December 1st — Nydia Kehnle, Nydia Kehnle Design

Monday, December 4th — Sharon Burgess, Lilabelle Lane Creations

Tuesday, December 5th — Cindy Guch, Raspberry Sunshine

Wednesday, December 6th — Sandi Sawa Hazlewood, Crafty Planner

Thursday, December 7th — Wynn Tann, zakkaArt

Friday, December 8th — Elise Baek, Elise & Emelie

Monday, December 11th — Ann Blalock, Coats & Clark Sewing Secrets

Tuesday, December 12th — Sara Lawson, Sew Sweetness  * Watch the Facebook Live video at 7pm CST

Wednesday, December 13th — Nancy Jewell, Free Spirit Fabrics

Thursday, December 14th —Annette Allison Millard, The Sewful Life

Friday, December 15th — Brenna Riley Gates, The Quilting Company

Boho Stitch Along. Week no. 19

Welcome back for Week no. 19! If you are just beginning a piece for the #BohoSAL, check out my previous posts here. And if you are new to embroidery and want to learn the basics, check out my embroidery book, Boho Embroidery for everything you need to get started!


My stitch Along piece this week is a hoop that I am making as a gift for one of my boy’s teachers…a little late for teacher appreciation week, but it will be done soon!

How cool is this fabric from Free Spirit Fabrics from the line, “Neptune and the Mermaid”?!

There’s a story behind this one, though…

I saw this fabulous fabric online and just had to buy it immediately (from Circa 15 Fabric Studio). When I buy fabrics, I don’t typically buy large quantities…usually a fat quarter or a 1/2 yard works for most of my projects. Not checking the size of this octopus, I quickly added a 1/4 yard to my cart and then added a few other things and then checked out.

I couldn’t wait to open the fabric when it arrived. Sadly, I realized that, with this particular fabric, I should have ordered a larger cut because I didn’t get one complete octopus. SO…if you like this one and want a complete octopus, don’t make my mistake and think you can get by with a 1/4 yard!


Here’s how I’ve made lemonade out of my lemon-ish purchase! I’ve been using the Lion Brand bonbons and seed beads to add swirly octopus legs around the flowers on the fabric.

I think it’s a pretty good fix, right?!


And speaking of Octopi (because we were, right?!), here’s another one I’ve been stitching. This one required lots and lots and LOTS of fussy cutting and another Free Spirit Fabric this one from Heather Bailey‘s “Hello Love” line. You’ll be seeing lots more from this one as I finish it off to send to Sue Spargo for Quilt Market this week!

Speaking of purchases (because we were, right?!), look at this beautiful trim! I have no particular project in mind for these, but I saw them and knew I had to have them for something!

And speaking of Quilt Market (because we were, right?!) Here’s a detail shot of one of the hoops i’ve been making for Robert Kaufman’s booth with the upcoming Jennifer Sampou “Shimmer On” fabrics (coming out in August).

Remember how I told you I love these Sulky 12 Wt. Cotton Petites? Well, this is what I love them for…they are brilliant for adding beads to my embroidery! They do not break (like when I tried to use just plain sewing machine thread) and you don’t have to separate threads (like when you use floss).

I’ll post more pics of these hoops around Quilt Market time!

And speaking of sneak peeks (because we were, right?!) Here’s a peek at a mini quilt made with my Fractured Color Wheel Embroidery Pattern. I used some of my favorite Anna Maria Horner fabrics combined with so beautiful You and Me batiks. My mom (even though she told me not to give her any credit!) did the quilting and binding and everything else for me!) It turned out better than I was picturing!! How about that butterfly in the center?!

So that’s this week all wrapped up! Hopefully your week was less jumbly and jam-packed than mine was (!) and that you have plenty of time for stitching in the coming week!

Happy stitching!