Boho Embroidery on YouTube

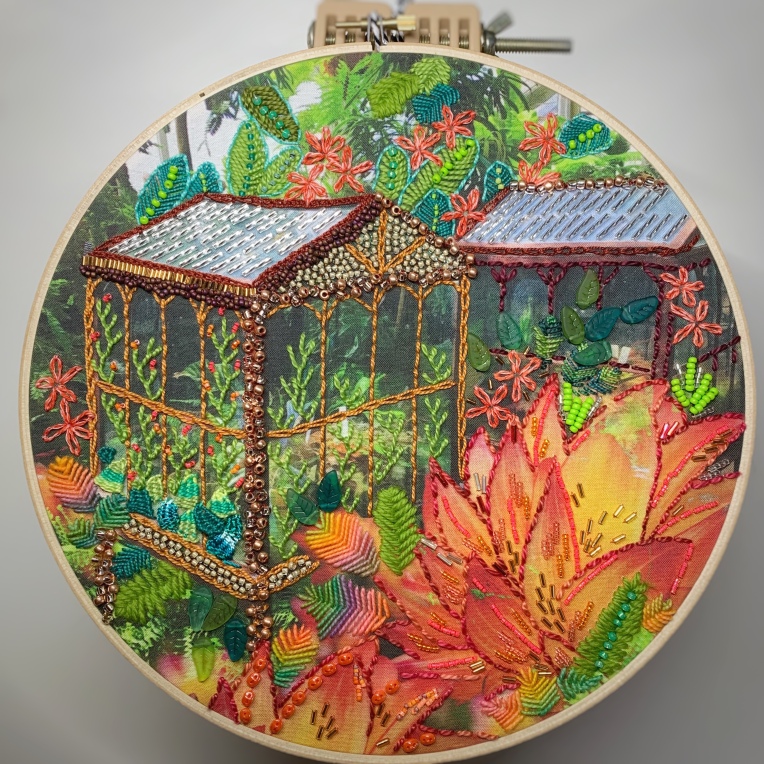
To coordinate with the release of my first fabric embroidery project, Boho Gardens: In the Conservatory, I’ve been stitching up some helpful videos and adding them to my YouTube channel!

Just a reminder: I’m currently accepting pre-orders for this project! The first batch of orders went out this week and the next batch will be shipping soon! You can send me an Instagram message or email me at bohostitchery@gmail.com to get in on the next shipment! These will eventually find their way into my Etsy shop once I have them in stock.


You can learn the Woven Picot stitch, which is great for adding dimension in the form of leaves.

For a twist on the Chain stitch, you can learn the Hungarian Braided Chain stitch, which gives you a thicker, braid-like line that can be added anywhere you would use the chain stitch.

And if you want to go all out with embellishments, you can learn one of my favorite stitches: the Feather stitch with a bonus lesson on how to add Lazy Daisies, seed beads and the Colonial Knot (which I prefer to the French Knot!)


To keep up to date with my videos, which I am constantly adding to, you can subscribe to my YouTube channel and you will receive a notification when I publish something new!

Happy stitching!


Boho Gardens: In the Conservatory

I have been working behind the scenes for quite a while on a project near and dear to my heart. I first began sharing my fabric collage/embroidery projects way, way back in the day (well, if 2012 counts as back in the day!), and each project was a combination of several fussy cut and layered fabrics that I then embroidered directly onto, creating a pattern as I went along.

Fast-forward to today and I still love embroidering layered fabrics that I have fussy cut and I especially enjoy teaching others how they can do this as well.

Boho Gardens: In the Conservatory combines my love of floral anything with trips to both large and small gardens (did you know Philadelphia, PA is the Garden Capital of America?!) and my photography. Mix this up, put it on fabric and you have the first wildboho embroidery project.

Designed to be placed in a 9″ or 10″ hoop, this project captures the spirit of how I first began to embroider fabric collages, except for all of the collage work has been done for you (by yours truly!) and you can focus just on the embroidery!

In addition, I am adding YouTube tutorials to the Boho Gardens section of my channel as inspiration to get you started. This project is designed for all levels of embroiderers and is meant to be embroidered however you would like. Free-spirited, no directions (my favorite kind of directions!) and the perfect slow-stitching project to just begin and take your time embroidering.

For now, I am only taking pre-orders through my instagram page (or a direct email to bohostitchery@gmail.com). These will eventually make their way into my Etsy shop. Orders are shipping soon (next week!) and I can’t wait to see how each person stitches their In the Conservatory hoop project!

Beaded Color Wheel

As an avid bead and button collector, I’m always looking for fun ways to use the supplies that I have. And maybe, just maybe, I’m always looking for an excuse to add to my collections!

I recently stitched one of my patterns, the Fractured Color Wheel, entirely in buttons.

This project took a little over two weeks and I worked on it almost exclusively during that time, but I didn’t track how many hours that I spent on it. A project like this is thought-consuming to me and so the time doesn’t even matter…I can hardly wait to return to it while I’m working on other things!

It is heavy…perhaps one of the heaviest hoops that I have ever stitched! In fact, I had to take it to the grocery store to weigh it on the produce scale and it came in at a whopping 1 lb, 8oz. That might not sound super heavy, but comparing it to most of my hoops (which probably don’t even reach 1 lb), it’s h e a v y!

Here’s the non-beaded, fabric-only version:


To convert this color wheel to an all-beaded wheel rather than a fabric one is very simple!

Choose a background fabric that is simple and light (it makes it easier to trace your pattern onto a light color). Your fabric will be so loaded up with beads and buttons and sequins by the end, that you won’t see it, so don’t use your favorite piece on this project!

Choose the color wheel size that you want to work with (the pattern offers three sizes). I chose to fit my color wheel into a 12-inch hoop.

Print out the pattern and place your fabric on it (pattern facing up, front side of the fabric facing up).

Using a light source (window or Lightbox) and a water soluble pen, trace the pattern onto the fabric. Again, your marks will not need to be washed off because they will be completely covered.

Once the pattern has been traced, fit the fabric into an embroidery hoop and tighten your fabric. And then let the fun begin!

With my fabric pen, I wrote the colors that I wanted to be in each portion of the color wheel. I then began with the biggest pieces…the buttons.

It helped to choose the buttons for each color and then stitch them in place before beginning with the beads. This helps you to visually focus on what color is placed in what spot, but it also helps to have the largest pieces in place first.

Once I had the large buttons in place, I began adding beads and sequins. Large beads first and the smallest beads last (the smallest beads help to fill in any areas that have white peeking through.

Continue adding your embellishments until you can’t see white through the hoop anymore. Tighten your fabric in the hoop once again and then follow the directions in the pattern for finishing the hoop. And you’re done!


One note about thread: I used <a href=”http://Sulky 12 Wt. Cotton Petites Thread” target=”_blank” rel=”noopener”>Sulky 12 wt Petites which is my favorite beading thread. I did not want to use a stranded thread because it’s a little tricky when you are working with lots of beads and I didn’t want to deal with tangles. Having a spool is really helpful. It’s also strong enough to handle all of this beading!

One other note: if you are stitching on heavy beads, it is helpful to stitch through the bead several times. The same thing goes for buttons. You are going to be spending lots of time on this, make sure your beads and buttons are on the fabric nice and tight so that if an accident happens, your beads don’t go scattering everywhere! And hopefully an accident doesn’t happen!

The embroidery stand that I used is also really helpful with a heavy embroidery project. You can find it here. I like that this stand is adjustable into several positions and it never feels like it’s going to be top-heavy when a project is secured into it.


And that’s it! With this post, I’m sending along to you the confidence to take on a project like this…it really is a beginner-friendly project! And it spotlights all of those special embellishments that you’ve been hoarding…I mean, collecting!!!

Have fun stitching and beading and be sure to tag me on Instagram if you take on this project!


Note: some links in this post are affiliate links. I will never recommend something to you that I have never personally tried and that I don’t stand behind for the use intended! 
Boho on Bluprint

titlecard_11736

I’m super excited to announce that my embroidery class with Bluprint, Boho Style: Mixed-Media Embroidery is now live and ready to be watched (and stitched along with!)

20181207_11736_boho-style-mixed-media-embroidery_nicole-vogelsinger_1046

In this class, you will receive three patterns and learn how to make them step by step! You’ll have fun stitching and embellishing with beads, charms and sequins.

20181207_11736_boho-style-mixed-media-embroidery_nicole-vogelsinger_1069

If you’ve ever wanted to take one of my workshops but I haven’t come to your area, this class is the next best thing!

I can’t wait to hear how you like these projects!!

Happy stitching!

Feathers and Flamingos

I’m so excited to share my latest digital patterns with you!

You may have seen me working on several geometric-themed hoops if you follow along on Instagram, namely a Flamingo and several versions of feathers. There was a reason for that…and it is because I have had new patterns in the works!

First off is this fancy Geometric Flamingo:

The pattern includes instructions for both an embroidery-only version (like the top picture) and an appliqué version (like the bottom version).

Next up is  Geometric Feathers:

There are three versions of feathers included in this pattern: a beginner version, an intermediate version and an advanced version. It also includes an embroidery-only version and instructions for all of these as well.

I’m teaching several classes at Quilt Con in Pasadena this month and two of the classes are all about creating a geometric abstraction. These patterns are partly for those who have signed up for the class and have requested ideas on what to make (!) and partly because I love geometric anything and have been having a lot of fun with my feathered theme!

I can’t wait to see what you create with your patterns!

Happy stitching!

Fractured Color Wheel

Well, it’s March 1st and that can mean only one thing (around here, anyway!) It’s time for the Spring embroidery pattern release! I’m really excited about this one.

When my book first came out, so many people commented about the color wheel on the front cover of the book. Because that project was made for one of the chapter headings, I did not include a pattern for it inside the book. But because I was asked about it over and over and over again, I thought I would create a new version, perfect to be stitched up for spring!

So here it is: the Fractured Color Wheel embroidery pattern!

Available for a limited time as a download in my Etsy shop, the PDF pattern contains instructions for creating a 6″, 9″ or 12″ version of the Fractured Color Wheel!

Here is the sample 12″ version that I made using some of my favorite Alison Glass fabrics. The background fabric on this one is a black Andover chambray (one of my favorite lightweight background fabrics!)

And then the 9″ version, which is my all-solid version. I used RJR Fabrics Cotton Supreme Solids, which are seriously a dream to work with. I don’t work with solids much, but when I do, they are my go-to solids!

The 6″ version is my Cotton + Steel color wheel. It was really fun to create color order out of these prints! And the tiny version of this can be worked up fairly quickly.

In the pattern, I included Stitch Guides to show you what stitches I used where on the color wheel. Almost all of the stitches can be found (with complete instructions) in my embroidery book.

Coming soon: stitch videos! Now, when I say “soon,” I mean it is an item on my ever increasing to-do list, so you know how that goes!!! It’s definitely something I’m working towards including here on my site.

So there you have it, a brand new pattern just perfect for Spring! I can’t wait to see what color/fabric combinations you create with this pattern!

If you are on Instagram and are working with this pattern, be sure to tag it #wildbohopatterns so that I can check out what you are creating!

Happy stitching!

-nichole