Beaded Color Wheel

As an avid bead and button collector, I’m always looking for fun ways to use the supplies that I have. And maybe, just maybe, I’m always looking for an excuse to add to my collections!

I recently stitched one of my patterns, the Fractured Color Wheel, entirely in buttons.

This project took a little over two weeks and I worked on it almost exclusively during that time, but I didn’t track how many hours that I spent on it. A project like this is thought-consuming to me and so the time doesn’t even matter…I can hardly wait to return to it while I’m working on other things!

It is heavy…perhaps one of the heaviest hoops that I have ever stitched! In fact, I had to take it to the grocery store to weigh it on the produce scale and it came in at a whopping 1 lb, 8oz. That might not sound super heavy, but comparing it to most of my hoops (which probably don’t even reach 1 lb), it’s h e a v y!

Here’s the non-beaded, fabric-only version:


To convert this color wheel to an all-beaded wheel rather than a fabric one is very simple!

Choose a background fabric that is simple and light (it makes it easier to trace your pattern onto a light color). Your fabric will be so loaded up with beads and buttons and sequins by the end, that you won’t see it, so don’t use your favorite piece on this project!

Choose the color wheel size that you want to work with (the pattern offers three sizes). I chose to fit my color wheel into a 12-inch hoop.

Print out the pattern and place your fabric on it (pattern facing up, front side of the fabric facing up).

Using a light source (window or Lightbox) and a water soluble pen, trace the pattern onto the fabric. Again, your marks will not need to be washed off because they will be completely covered.

Once the pattern has been traced, fit the fabric into an embroidery hoop and tighten your fabric. And then let the fun begin!

With my fabric pen, I wrote the colors that I wanted to be in each portion of the color wheel. I then began with the biggest pieces…the buttons.

It helped to choose the buttons for each color and then stitch them in place before beginning with the beads. This helps you to visually focus on what color is placed in what spot, but it also helps to have the largest pieces in place first.

Once I had the large buttons in place, I began adding beads and sequins. Large beads first and the smallest beads last (the smallest beads help to fill in any areas that have white peeking through.

Continue adding your embellishments until you can’t see white through the hoop anymore. Tighten your fabric in the hoop once again and then follow the directions in the pattern for finishing the hoop. And you’re done!


One note about thread: I used <a href=”http://Sulky 12 Wt. Cotton Petites Thread” target=”_blank” rel=”noopener”>Sulky 12 wt Petites which is my favorite beading thread. I did not want to use a stranded thread because it’s a little tricky when you are working with lots of beads and I didn’t want to deal with tangles. Having a spool is really helpful. It’s also strong enough to handle all of this beading!

One other note: if you are stitching on heavy beads, it is helpful to stitch through the bead several times. The same thing goes for buttons. You are going to be spending lots of time on this, make sure your beads and buttons are on the fabric nice and tight so that if an accident happens, your beads don’t go scattering everywhere! And hopefully an accident doesn’t happen!

The embroidery stand that I used is also really helpful with a heavy embroidery project. You can find it here. I like that this stand is adjustable into several positions and it never feels like it’s going to be top-heavy when a project is secured into it.


And that’s it! With this post, I’m sending along to you the confidence to take on a project like this…it really is a beginner-friendly project! And it spotlights all of those special embellishments that you’ve been hoarding…I mean, collecting!!!

Have fun stitching and beading and be sure to tag me on Instagram if you take on this project!


Note: some links in this post are affiliate links. I will never recommend something to you that I have never personally tried and that I don’t stand behind for the use intended! 
Clover Fabric Yo-Yo Maker

I have been working on a series of Boho Crazy Hoops, which are inspired by crazy quilts and incorporate loads of texture. Part of that texture is in the form of fabric yo-yos, which are addictively fun to make.

After posting pictures of these yo-yos, i’ve been asked a lot how to make them, so, without further ado, here are the super-simple-step-by-step-fabric-yo-yo instructions for you!

Supplies needed:

  • Clover Round Yo-Yo Maker (for this sample, I have used the Large size)
  • Sulky 12 Wt Petites thread (or similar weight thread, this one is about the weight of 2 strands of embroidery floss)
  • Scissors
  • Needle
  • Fabric (in this example, I used a shiny, slippery, metallic-y fabric…I suggest starting with something nice and simple like a cotton weight fabric!!)

Now that you have your supplies, you are ready to make some yo-yos!

Separate the Clover yo-yo maker and sandwich the fabric in between the layers of the maker. You’ll notice on the directions that it tells you to line up these lines with the little notches on the other side. That is important!

This is the backside of the fabric and the backside of the yo-yo maker.

See the little notches around the outside edge? Those are what will line up with the lines on the other side of the disk. This is the front side of the maker and fabric and it is what you will be looking at while you stitch.

Trim your fabric, leaving about 1/2″ of fabric all the way around.

Here’s a close up of the thread. This is the thread that I use for all of my beadwork and yo-yo making! I love that it comes on a spool and that I don’t have to divide threads before stitching.

It’s time to get stitching!

Thread your needle and knot the end of your thread.

Bring your needle and thread up through the right side of a slot (it doesn’t matter which slot you start with) and then take the needle and thread down on left side of the slot)

Continue this all the way around until you have stitched in each slot. When you stitch your way around and you have arrived back at the first slot on the yo-yo maker, you are going to stitch that one again.

It’s time to take your fabric out of the yo-yo maker. Just pop the sections apart and gently pull your fabric off of the disk.

With your needle and thread still attached, you are going to pull the fabric tight and you’ll see that it starts to bunch up. Continue doing this until you have a lovely little yo-yo shape.

You will need to adjust the fabric yo-yo until it looks symmetrical all the way around.

When it looks good to you, tie off your stitch. I like to make a small stitch and knot it, just to make sure the yo-yo is secure and won’t come apart. Trim your thread and you have made your first yo-yo!

Wasn’t that fun?! Now picture making these to coordinate with fabrics that you are embroidering!

Coloring with Thread Book Showcase

Photo courtesy of The Quilting Company 

Late last year, I was excited to work on a stitching project based on a pattern by Tula Pink that was going to be included in her new embroidery book, Coloring with Thread: Stitching a Whimsical World with Hand Embroidery.

Check out that center Octopus hoop in the picture up there (maybe, just maybe, it was stitched by yours truly!)

If you love Tula Pink’s fabric, then, no doubt, you will be excited to get your hands on a book full of her embroidery patterns!

When I was asked to stitch up another pattern from her book as part of the Coloring with Thread blog tour, I couldn’t wait to try Boho-ing up one of her designs: the Double Bunny.

I feel like I need to add this disclaimer before going any further: for my sanity (and yours!), I highly recommend enlarging your chosen patterns before you try this method for yourself. Seriously. Tula Pink designs are gorgeously intricate but cutting so many teeny, tiny fabric pieces might just be enough to push the most patient of fussy cutters to the brink of frustration!

I began with enlarging the Double Bunny pattern.

Enlarging a pattern is incredibly easy if you have an office supply store nearby. Take your pattern in and ask them to make an engineering print in whatever size you need. I enlarged the Double Bunny pattern to 14″ and it fits perfectly in a 14″ hoop.

Once I had my copy of the pattern, I used the techniques outlined in my book, Boho Embroidery to transfer the pattern to a selection of my favorite Tula Pink fabrics.

Here’s what I ended up with once I ironed all of the fabric pieces in place.

Using Madeline Tosh Unicorn Tails yarns and the Stem Stitch, I outlined all of the pieces. You can see what a difference it makes when each piece has been outlined:

And then I just kept on embroidering! I added sequins and beads and finished it up just in the nick of time so that I could share it with all of you! Here’s how it looks all stitched up:

And how about some up close and personal detail shots, because it’s all about the details!

The sequins make these feel like Disco Bunnies, don’t they?!

And there you have it!

If you want to try your hand at an embroidery project like this, here are the specialty Threads and beads that I used:

This yarn is really fun to embroider with….I mean, check out those colors! You can find these “Unicorn Tails” at Mad Tosh.

If you’ve been following along for awhile now, you already know how much I love the Eleganza Perle Cotton from Sue Spargo and Wonderfil Specialty Threads! I used the size #8 and in some cases doubled it up so that my stitches stood out next to the Unicorn Tails. I could have just used a size #5 or #3, which are both thicker, except I was gifted this box of threads and the colors matched perfectly!

Another one of my favorite threads (especially to use when working with beads and sequins) is Sulky Petites. These threads are approximately the weight of 2-strands of a floss like DMC that gets separated, except you can use these right off the spool without separating strands.

And speaking of beads, my favorite seed bead source is Fusion Beads. (How about that neon pink?!) I used size 8 seed beads for this project.

And if all of this seems completely overwhelming and you just want to stitch a pattern, look how completely different this project can be if it is simply embroidered using the Tula Pink color guides and her pattern from the book!

photo courtesy of The Quilting Company and stitched by Elise Baek

Please be sure to check out all of the other amazing embroidery projects on this Book Showcase!

Here’s the full schedule:

Monday, November 27th — The Quilting Company

Tuesday, November 28th — Minki Kim, Minki’s Worktable

Wednesday, November 29th — Nichole Vogelsinger, Wildboho

Thursday, November 30th — Amanda Carestio, Sew Daily

Friday, December 1st — Nydia Kehnle, Nydia Kehnle Design

Monday, December 4th — Sharon Burgess, Lilabelle Lane Creations

Tuesday, December 5th — Cindy Guch, Raspberry Sunshine

Wednesday, December 6th — Sandi Sawa Hazlewood, Crafty Planner

Thursday, December 7th — Wynn Tann, zakkaArt

Friday, December 8th — Elise Baek, Elise & Emelie

Monday, December 11th — Ann Blalock, Coats & Clark Sewing Secrets

Tuesday, December 12th — Sara Lawson, Sew Sweetness  * Watch the Facebook Live video at 7pm CST

Wednesday, December 13th — Nancy Jewell, Free Spirit Fabrics

Thursday, December 14th —Annette Allison Millard, The Sewful Life

Friday, December 15th — Brenna Riley Gates, The Quilting Company

Thread Round-Up

As someone who works with lots of threads and always on the lookout for new colors and textures to try, it is one of my favorite questions when I am asked: “what threads do you recommend?”

So here’s a quick thread round-up for you if you are thinking of starting an embroidery project and want to try something new!


Hands down, my favorite everyday embroidery thread is Eleganza Perle Cotton. A collaboration with Wonderfil Specialty Thread, these colors from Sue Spargo are rich and saturated and match any project I am working on.

In the picture below, you will notice that size 5 is slightly thicker than size 8. With Perle Cotton, you do not need to separate threads, like you might typically do with regular floss. This is meant to be used directly off the spool, which might partially be why I like it so much!

You also get a lot of thread for your money with these spools! The size 5 comes in 40 yard spools and the size 8 comes in 70 yard spools.

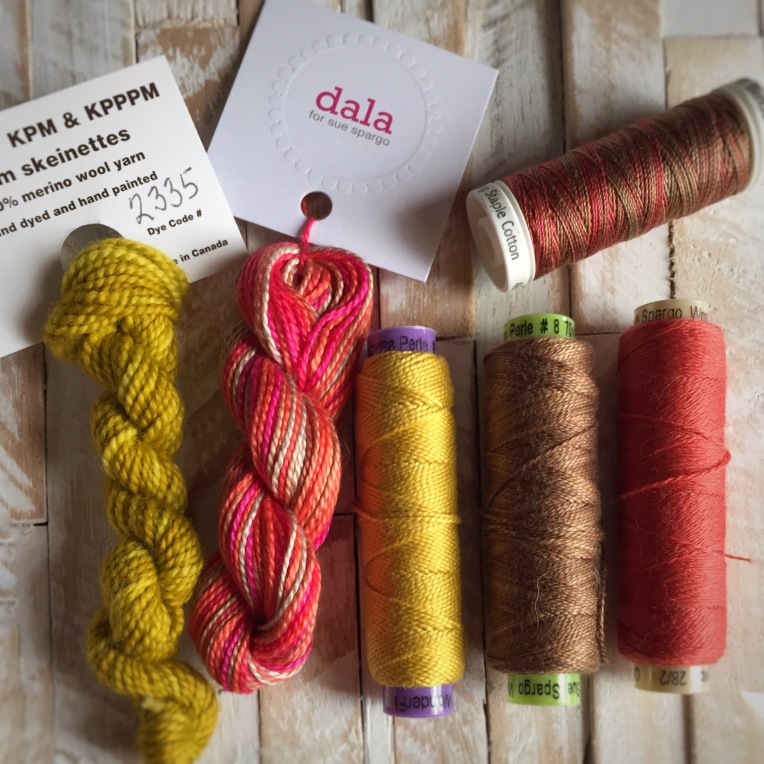
This Dala Perle Cotton also comes from Sue Spargo, only this one is hand-dyed in small batches by her daughter, Kelly. The colors in these variegated threads are also incredible!

If you are used to using thinner threads but want to add a bit more texture to your work, I suggest giving this particular brand a try. It is easy to work with, does not need to be separated and also adds lovely visibility to your stitches. And notice the twist in the threads? That adds to the texture of your work and gives it a bit of shine. If you are going to be spending lots of time adding your embroidery to a project, you definitely want those stitches to stand out, right?!

Have you ever worked with wool yarn or thread in your embroidery? If you haven’t, these are my two favorite brands of wool yarn to use in my hand stitched projects.

On the left is Koigu Needlepoint Yarn which I picked up on a recent trip to Purl Soho in NYC. It comes in 11 yard hanks and is the weight of a fingering yarn. It does not need to be separated like regular embroidery floss. I have found that even though it looks thicker, it threads through Milliner’s Needles easily and I haven’t had any problems using it in my embroidery.

The Ellana wool thread on the spool is from Sue Spargo. Compared to the spools of Eleganza Perle cotton, this thread is thinner and wispier. I like to use it double stranded, but if you are looking to add delicate texture, then you can certainly use it as a single strand. This also comes 70 yards to a spool and the color selection cannot be beat! I could seriously find a use for every single color in this collection!!!

My favorite threads for adding beads to my work are these Sulky Petites and Sulky Blendables. When compared to a DMC type floss, these are the weight of 2-strands of floss. Each spool is 50 yards. I like using these to add beads because the colors are subtle enough to blend with my work and I rarely have problems with the thread tangling. This is a nice, lightweight addition to my embroidery toolbox!